Tuesday, December 29, 2009

Reverting a deleted file in Subversion

Last week I accidently a file from the SVN repo and had to revert the delete. Here's a procedure to

1. Do a svn log on the directory where the file used to exist. That will show the deleted file commit action


bash> svn log --verbose

deleting MSN creative change
------------------------------------------------------------------------
r1438 | sudhirv | 2009-12-28 15:13:46 -0800 (Mon, 28 Dec 2009) | 1 line
Changed paths:
D /trunk/lib/ETL/Transform/MSNCreativeTransformByAdId.pm


2. So the above file needs to be reverted. Get the previous version of the file to working copy.


bash> svn copy --revision 1437 \
http://somecompany.com/svn/trunk/lib/ETL/Transform/MSNCreativeTransformByAdId.pm MSNCreativeTransformByAdId.pm


3. Doing a SVN status will now show that there is a file waiting to be added to the rep with previous history. Quoted from the book "The plus sign in the status output indicates that the item isn't merely scheduled for addition, but scheduled for addition “with history”. Subversion remembers where it was copied from. In the future, running svn log on this file will traverse back through the file's resurrection and through all the history it had prior to revision 1438. In other words, this new MSNCreativeTransformByAdId.pm isn't really new; it's a direct descendant of the original, deleted file."


bash> $ svn status
A + MSNCreativeTransformByAdId.pm


4. Use the svn commit to commit the file.


bash> svn commit -m "reverting delete to revision 1437" MSNCreativeTransformByAdId.pm

Wednesday, December 16, 2009

Mysql backups using LVM snapshots

Logical Volume Manager (LVM) provides the ability to take a snapshot of any logical volume for the purpose of obtaining a backup of a partition in a consistent state. As applications may access files or databases on a partition during a backup some files may be backed up in one state, while later files are backed up after an update has been made, leading to an inconsistent backup. Traditionally the solution has been to mount the partition read-only, apply table-level write locks to databases or shut down the database engine etc.; all measures which adversely impact availability (but not as much as data loss without a backup will). With LVM snapshots it is possible to obtain a consistent backup without compromising availability. The LVM snapshot works by logging the changes to the filesystem to the snapshot partition, rather than mirroring the partition. Thus when you create a snapshot partition you do not need to use space equal to the size of the partition that you are taking a snapshot of, but rather the amount of changes that it will undergo during the lifetime of the snapshot. This is a function of both how much data is being written to the partition and also how long you intend keeping the LVM snapshot. The longer you leave it, the more changes there are likely to be on the file system and the more the snapshot partition will fill up with change information. The higher the rate of change on the partition the shorter the lifespan of the snapshot. If the amount of changes on the LVM partition exceed the size of the snapshot then the snapshot is released. Step by step procedure to backup using snapshot

1. Connect to MySQL and run FLUSH TABLES WITH READ LOCK
2. While holding connection open run: lvcreate -L16G -s -n dbbackup /dev/Main/Data – This will create snapshot named dbbackup for Logical Volume Main/Data . You should specify enough of undo space to hold modifications during backup process – I’ve specified 16GB in this case. If your undo size is not large enough snapshot will get invalidated and backup will be aborted.
3. Snapshot created, now you want to let MySQL Server to continue, which is done by running UNLOCK TABLES or simply closing connection.
4. Mount backup Filesystem: mount /dev/Main/dbbackup /mnt/backup
5. Copy the data from the above mount to tape or any other source
6. Unmount filesystem umount /mnt/backup
7. Remove snapshot: lvremove -f /dev/Main/dbbackup

So how does the LVM snapshot work internally. LVM snapshots are an example of a copy-on-write snapshot solution. When you have an LVM volume with no snapshots, writes to the volume happen as you’d expect. A block is changed, and that’s it. So in the above case before the snapshot is created, any db inserts/updates that causes a write IO is normally written to the data directory. As soon as you create a snapshot, LVM creates a pool of blocks. I believe that this pool also contains a full copy of the metadata (only metadata not the full data) of the volume. When writes happen to the main volume (i.e. the directory off of which snapshot is created), the block being overwritten is copied to this new pool and the new block is written to the main volume. This is the ‘copy-on-write’. Because of this, the more data that gets changed between when a snapshot was taken and the current state of the main volume, the more space will get consumed by that snapshot pool. The normal way that LVM snapshots are used is not for long-term storage, but rather to get a consistent “picture” of the filesystem such that a backup can be taken. Once the backup is done, the snapshot is discarded. When you mount the snapshot, the meta-data written when the snapshot was taken allows the directory tree to be presented. Blocks that haven’t been changed since the snapshot was taken are read directly from the main volume. Blocks that have been changed are read from the snapshot pool. You don’t want to leave snapshots laying around because (a) they’ll fill up and become unusable, and (b) the system’s performance is impacted while a snapshot is active– things get slower.

Wednesday, November 04, 2009

Hibernate flush only specific object types

So we have this issue where in certain cases we would only like to flush a certain class of objects and discard the rest. This is sort of a common use case if you are following the one session per request paradigm wherein if a job/request fails and the job status logging is also done via the database/hibernate then you would still want to persist the job log status however the application job data changes can be discarded. Found an excellent post here:

https://forum.hibernate.org/viewtopic.php?f=1&t=983747&sid=4988e082644059b66220836ef4c53806&start=15

So as it turns out there is no way to selectively flush objects. You can use the "evict non flushable objects" methodology (basically bu evicting the objects their changes are discarded) but often times you don't know what all objects were involved in the request.

A better design is to probably open two sessions with each request/job. One for meta data and the other for application business data. That allows better handling of request failures.

Sunday, October 04, 2009

Enable Mysql general query log in Mac OSX

To enable this for the current user follow the below steps

-- create or edit the existing cnf file
vim ~/.my.cnf

-- add the below variable to the file
[server]
log=/tmp/mysql_query.log

-- restart mysql
sudo /Library/StartupItems/MySQLCOM/MySQLCOM stop
sudo /Library/StartupItems/MySQLCOM/MySQLCOM start

To enable the general query log for all users add the "variable" to /etc/my.cnf instead.

Sunday, August 30, 2009

Adobe Flash freezes on full screen

Have been having this problem recently wherein doing a full screen on a flash video freezes the screen. My wife watches movies online occasionally on MegaVideo/Veoh and the problem persists in both as both use flash internally.

While the Flash player is in normal mode, right click on the player and choose "Settings" from the context menu. Remove the checkmark in the box next to "Enable Hardware Acceleration".


Reference links
http://support.mozilla.com/si/kb/Cannot+view+full+screen+Flash+videos
http://www.macromedia.com/support/documentation/en/flashplayer/help/help01.html

Friday, August 14, 2009

Adcenter keyword: Setting match type

Adcenter is different from other networks as it does not have a special attribute called “match type” on a keyword. Instead each keyword has three bid fields “exact bid (EB)”, “phrase bid (PB)” and “broad bid (BB)”. The keyword match types are determined on whether a bid is specified for that match type. For instance if a keyword has EB=1.5,PB=0.75,BB=0.0 then this keyword is used in exact and phrase matches. This is different in other networks where a keyword has a single “bid” attribute and an attribute to specify match type.

Friday, August 07, 2009

Monitoring Gearman over telnet port 4730

So the only way to monitor Gearman is via doing a telnet to port 4730. The current monitoring supported commands are fairly basic. I could not locate any documentation on the support commands so had to literally look at the code to figure out the supported commands (the below command documentation is copied from the comments in code). There are plans to include more set of commands in the next release.

Command: STATUS

The output format of this function is tab separated columns as follows, followed by a line consisting of a full stop and a newline (".\n") to indicate the end of output. below are the columns shown

- Function name : A string denoting the name of the function of the job
- Number in queue : A positive integer indicating the total number of jobs for this function in the queue. This includes currently running ones as well (next column)
- Number of jobs running : A positive integer showing how many jobs of this function are currently running
- Number of capable workers : A positive integer denoting the maximum possible count of workers that could be doing this job. Though they may not all be working on it due to other tasks holding them busy.

Command : Workers

This command show the details of various clients registered with the gearmand server. For each worker it shows the following info:

- Peer IP: Client remote host
- Client ID: Unique ID assigned to client
- Functions: List of functions this client has registered for.

Any other command text throws a error "ERR unknown_command Unknown+server+command"


sudhirv@sudhirv:~$ telnet localhost 4730
Trying ::1...
Trying 127.0.0.1...
Connected to localhost.
Escape character is '^]'.

STATUS
.
WORKERS
11 127.0.0.1 - :
.
status
.
workers
11 127.0.0.1 - :
.
some crap
ERR unknown_command Unknown+server+command

#### will add more samples in action when I have this thing up and running ####

Installing Gearman on Ubuntu

Gearman is a open source job forking system. We have been evaluating its use in our project to share jobs across components. More info on the Gearman project can be found here: http://gearman.org/.

Here are the instructions on installing Gearman on Ubuntu


wget http://launchpad.net/gearmand/trunk/0.9/+download/gearmand-0.9.tar.gz
tar -xvzf gearmand-0.9.tar.gz

# two missing libraries that found at configure time
sudo apt-get install libevent-dev
sudo apt-get install uuid-dev

cd gearmand-0.9
./configure
make
sudo make install
sudo ldconfig

# start gearman
gearmand &

# check gearmand running
ps auxw | grep [g]earmand

# check germand listening for jobs on tcp port 4730
sudo lsof -i tcp:4730


# errors when starting gearman
Error: gearman: error while loading shared libraries: libgearman.so.1

Solution: `make install` may install libraries into `/usr/local/lib`. It's possible
that this directory isn't on your library search path, which will result in an error
like: "gearman: error while loading shared libraries: libgearman.so.1." To fix this,
either add `/usr/local/lib` to `LD_LIBRARY_PATH`, or modify `/etc/ld.so.conf` or
`/etc/ld.so.conf.d` to add `/usr/local/lib`, then run: sudo ldconfig

Extract process attributes

Handy one liner scripts to extract various process attributes. You can add additional attributes to the 'ps' command to get other attributes. Below are some samples

-- Process start hour
ps -eo pgid,lstart,cmd | grep "[p]name" | awk '{print $5}' | cut -d\. -f1

-- Process start minute
ps -eo pgid,lstart,cmd | grep "[p]name" | awk '{print $5}' | cut -d\. -f2

--process start day
ps -eo pgid,lstart,cmd | grep "[p]name" | awk '{print $4}'

command to kill a process group

If pid is negative but not -1, the signal is sent to all processes whose process group ID is equal to the absolute value of pid. The negative pid is specified in this way:

kill -s KILL -- -nn

where nn is the process group ID and may have a range of 2 to 7 digits (nn to nnnnnnn).

kill -s KILL -- -9812753

The format must include the – – – before the nn in order to specify the process group ID

Saturday, June 06, 2009

Ubuntu 9.04 resets resolution @ restart

Spent quite some time today trying to make this work. Installed Ubuntu 9.04 this AM and as expected it was not able to correctly detect the monitor resolution. Installed the latest NVidia drivers (180.44) from Synaptic package and was able to set the right resolution using "nvidia-settings" app. Before saving the configuration made sure that preview of "/etc/X11/xorg.conf" was showing as to what I had set. Restarted the system and the resolution was getting set back to "800x600". Applying a resolution using 'nvidia-settings" was still working in the session however @ logout/restart it would revert back to "800x600". Here's what all I tried and the final step that worked for me:

1) The first question I had was whether nvidia drivers were being loaded at restart or not. One of the Ubuntu knowledge base suggested adding "nvidia" to "/etc/modules" such that it gets loaded at boot time but that didn't work.

.... After many failed google searches I shifted my focus to looking at system logs for any clues......

2) checked this log file after system startup "/var/log/gdm/:0.log" and it was complaining about error loading "type2" and "freetype" modules. I wasn't sure if this was causing the "xorg.comf" to fail so I manually disabled the load of these modules in the "xorg.conf" file under the section module like below. Did a restart but still the same situation however the log "/var/log/gdm/:0.log" was not showing the error this time.

Section "Module"
Load "dbe"
Load "extmod"
# Load "type1"
# Load "freetype"
Load "glx"
EndSection

2) Check log file "/var/log/Xorg.0.log". This log contains details on "xorg.conf" loading. Watchout for any errors in this log. In my case this log looked fine except the last line in the log file that said "[nvidia]: setting resolution 800x600". This baffled me. While the earlier lines in the log file correctly stated loading the correct resolution from 'xorg.conf', this last log line almost seemed like some another process was invoking at startup that was turning the resolution back to '800x600'. Googled around but no clue.

... Took a walk at a park nearby as my brains was about to explode.

3) Lot of sites/forums had samples of "xorg.conf" files from users whose system was working fine. Tried various of those but still no luck.

4) One of the forums post suggested this method. "System --> Preferences --> Display". Choosing that option prompts a question "It appears that your graphics driver does not support the necessary extensions to use this tool. Do you want to use your graphics driver vendor's tool instead?". if you click "yes" it takes you to the "nvidia-settings" tool. If you choose the "No" option, it allows choosing a resolution via the "Display Preferences" window. I select "No" and choose the desired resolution of "1280x1024" from the list and hit "Apply". As usual it worked in the session and voila!!!! it also worked after a restart. The resolution stayed @ "1280x1024".

Obviously there were a lot of other steps that I tried in vain but these seemed worth a note as they provide some clue as to what the issue might be. Hope this post helps.

my google searched keywords: Xorg.log nvidia 800x600, Ubuntu 9.04 resets resolution restart, ubuntu 9.04 stuck at 800x600, ubuntu 9.04 low graphics mode, ubuntu 9.04 loose settings on restart, ubuntu 9.04 lost screen resolution after restart

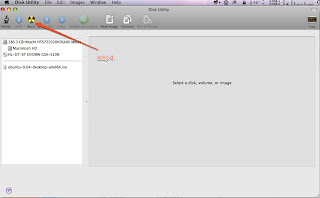
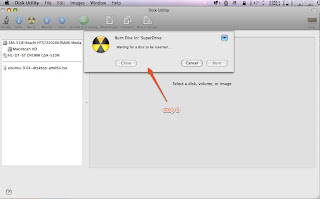
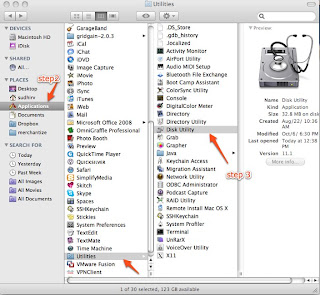
Mac OSX Burn ISO Image

Here are the steps.

1) Open Finder
2) Browse "Application/Utilities"
3) Open/double click Disk utility
4) Click "Burn" icon on top. This will ask you to choose a ISO image
5) Once selected it will ask to insert a CD and voila.

Off course its easy but when you've been using Linux and Windows utilities for years, these steps can be a little perplexing and hard to remember.

******************* screenshots **********************


Wednesday, January 28, 2009

Perl Mysql DBI get deleted row count

Trying to capture the number of deleted rows when executing a delete statement was returning a "0E0". See below for the script details. What I found was that it was DBI's way of saying zero rows were deleted. The thing to know about DBI is that do() needs to return distinct values to distinguish the occurrence of an error from the case that no rows were affected, so it uses “undef” and “0E0”. The value “undef” indicates an error; it evaluates to false in a Boolean context. The string “0E0” indicates that no rows were affected; it evaluates to true in Boolean contexts but is treated as zero in numeric contexts. If do() returned 0 to indicate no rows were affected, that evaluates to false in a Booelan context and would be difficult from an error. You can do the following to display the row count correctly

Error:

my $deleted = $conn->do("delete from employee where year between 1901 and 1910");
print "deleted $deleted rows.\n";

The above would print "deleted 0E0 rows"


Solution:

 
my $deleted = $conn->do("delete from employee where year between 1901 and 1910");
printf "deleted %d rows.\n", $deleted;

(OR)

my $deleted += $conn->do("delete from employee where year between 1901 and 1910");
print "deleted $deleted rows.\n";

Monday, January 26, 2009

Adcenter Error Code 1514 : The Negative keywords requires partial match bid

Got this error when dealing with a keyword update through the Adcenter API. Its a shame that Microsoft has no documentation on this error and none the less anywhere on the internet, hence the drive to blog this. Here's a brief background on Adcenter Negative Keywords:

http://msdn.microsoft.com/en-us/library/bb545038.aspx

So what the error basically means is that "Negative keywords are only allowed on keywords that have a broad or phrase match bid specified". If you try to add/update a keyword with "Not Keywords" and only exact bid specified then you would get this error. In my case this was being caused by a different scenario. We use Apache Axis for our webservice calls and Axis treats a blank string as a valid content string when compared to a null string. So even if the "Not Keywords" was set to blank it was generating the "Negative Keyword" soap element. See below for SOAP source. In the soap below the broad and phrase bid is specified as 0's and the "NegativeKeywords" element is constructed making MSN think that there are negative keywords associated with this keyword and hence the error. I resolved this error by setting the string to NULL instead of a blank ("''").

<?xml version="1.0" encoding="UTF-8"?>
<soapenv:Envelope xmlns:soapenv="http://schemas.xmlsoap.org/soap/envelope/" xmlns:xsd="http://www.w3.org/2001/XMLSchema" xmlns:xsi="http://www.w3.org/2001/XMLSchema-instance">
<soapenv:Header><ns1:ApplicationToken soapenv:actor="http://schemas.xmlsoap.org/soap/actor/next" soapenv:mustUnderstand="0" xmlns:ns1="https://adcenter.microsoft.com/api/advertiser/v5"/><ns2:DeveloperToken soapenv:actor="http://schemas.xmlsoap.org/soap/actor/next" soapenv:mustUnderstand="0" xmlns:ns2="https://adcenter.microsoft.com/api/advertiser/v5"><ns2:Value>xxxx</ns2:Value></ns2:DeveloperToken><ns3:UserCredentials soapenv:actor="http://schemas.xmlsoap.org/soap/actor/next" soapenv:mustUnderstand="0" xmlns:ns3="https://adcenter.microsoft.com/api/advertiser/v5"><ns3:Password>xxxxxx</ns3:Password><ns3:Username>xxxxx</ns3:Username></ns3:UserCredentials></soapenv:Header>
<soapenv:Body>
<UpdateKeywordsRequest xmlns="https://adcenter.microsoft.com/api/advertiser/v5"><AdGroupId>xxxxx</AdGroupId><Keywords>
<Keyword><BroadMatchBid>0.0</BroadMatchBid><ExactMatchBid>0.5</ExactMatchBid><Id>xxxxx</Id><NegativeKeywords><ns4:string xmlns:ns4="http://schemas.microsoft.com/2003/10/Serialization/Arrays"></ns4:string></NegativeKeywords><Param1>xxxx</Param1><Param2></Param2><Param3></Param3><PhraseMatchBid>0.0</PhraseMatchBid></Keyword>
<Keyword><BroadMatchBid>0.0</BroadMatchBid><ExactMatchBid>0.5</ExactMatchBid><Id>xxxxxx</Id><NegativeKeywords><ns5:string xmlns:ns5="http://schemas.microsoft.com/2003/10/Serialization/Arrays"></ns5:string></NegativeKeywords><Param1>xxxxxxx</Param1><Param2></Param2><Param3></Param3><PhraseMatchBid>0.0</PhraseMatchBid></Keyword>
</Keywords>
</UpdateKeywordsRequest>
</soapenv:Body>
</soapenv:Envelope>


<s:Envelope xmlns:s="http://schemas.xmlsoap.org/soap/envelope/">
<s:Body><s:Fault><faultcode>s:Client</faultcode><faultstring xml:lang="en-US">Invalid client data. Check the SOAP fault details for more information</faultstring>
<detail>
<EditorialApiFaultDetail xmlns="https://adcenter.microsoft.com/api/advertiser/v5" xmlns:i="http://www.w3.org/2001/XMLSchema-instance">
<BatchErrors>
<BatchError><Code>1514</Code><Details i:nil="true"/><Index>0</Index><Message>The Negative keywords requires partial match bid.</Message></BatchError>
<BatchError><Code>1514</Code><Details i:nil="true"/><Index>1</Index><Message>The Negative keywords requires partial match bid.</Message></BatchError>
</BatchErrors>
<OperationErrors/>
<TrackingId>xxxxxxx</TrackingId>
<EditorialErrors/></EditorialApiFaultDetail>
</detail>
</s:Fault></s:Body>
</s:Envelope>

Tuesday, January 20, 2009

Mysql (errno: 13) can't find file frm

Recently got this error when I was trying to copy a database on to another server. I basically copied the mysql data directory for the corresponding database on to the new server and logged into mysql client.


mysql> select count(*) from placement;
Can't find file: './main/placement.frm (errno: 13)


Checked the mysql log and this was being reported for the all frm files for all tables in the db. Looks like this is a permission issue on the data directory. Changed to the following permissions and it seemed to work.


server> sudo chmod -R 660 main
server> sudo chmod 775 main

Thursday, January 15, 2009

DBD::mysql::db do failed: The used command is not allowed with this MySQL version

Our nightly etl process loads a whole lot of data from local files. The recent upgrade of mysql from 5.0.45 --> 5.0.67 was throwing this error

"DBD::mysql::db do failed: The used command is not allowed with this MySQL version"

when using the mysql 'LOAD LOCAL FILE' command. We are not entirely sure if this is an issue caused by the mysql upgrade or an outdated perl DBD:Mysql module. MySQL server has the local_infile set to ON via a show variables command (see below) and user has the FILE permission to the local file. A reinstall of the DBD:Mysql module also did not resolve the issue.


mysql> show variables like 'local%';
+---------------+-------+
| Variable_name | Value |
+---------------+-------+
| local_infile | ON |
+---------------+-------+

Looking online we came through various links that suggested we needed to specify a option "mysql_local_infile" while connecting to mysql via the DBD:Mysql module. This seemed to resolve our issue.


use strict;
use DBI;
my $dsn = "DBI:mysql:mydb;mysql_local_infile=1";
my $user = "me";
my $password = "secret";
my $dbh = DBI->connect($dsn,$user,$password);


References:
http://dev.mysql.com/doc/refman/5.0/en/load-data-local.html
http://www.perlmonks.org/?node_id=728472
http://www.bigresource.com/MYSQL-LOAD-DATA-INFILE-command-to-import-a-text-f
ile-rODHiNex.html

DBD:Mysql warning statements "Use of uninitialized value in concatenation (.) or string"

We recently upgraded to the latest and greatest version of the DBD:Mysql perl module and have been seeing these warning statements in our logs a lot (believe me a whole lot to the point of annoyance for developers skimming through logs for debug help).

Use of uninitialized value in concatenation (.) or string at /usr/local/perl/lib/site_perl/5.8.8/x86_64-linux-thread-multi/DBI.pm line 929.

For now we went ahead and commented the line no. 929 in the /usr/local/perl/lib/site_perl/5.8.8/x86_64-linux-thread-multi/DBI.pm file and have seen no side effects of that. A fairly weak solution but works for now.

Wednesday, January 07, 2009

setting up a home server

I am a software guy by profession and have been lately delving into some system ops at work. Been playing around with a home server for the last month or so mostly for learning purposes. Lots of questions and searching on the internet. Came across this book that is quite useful to understand some of the basics around setting up a home network. "Home Wireless Networking in a Snap (Sams Teach Yourself) (Paperback)" (http://www.amazon.com/gp/product/0672327023). I am a linux guy and although this book is based on setting a windows server, still the router related stuff applies everywhere. Came across this book when I was trying to resolve as to why my home server won't respond to ping although ssh and ftp works. DUH!!! the router is the public interface for the home network and the settings on the router was configured to not respond to ping requests. The WAN setup page on my netgear router has a setting "Allow Pinging of Router Internet Interface" that needs to be enabled. There are some other cool stuff that can be set on the WAN setup page. See description and picture below:

Enable/Disable Firewall

Select the appropriate check box or option button to turn on your router's firewall. Some routers (such as my Netgear router) have the firewall enabled by default, and the configuration page does not provide an enable option; it only allows you to disable the firewall by selecting Disable SPI Firewall. Disabling the firewall opens up your network to the possibility of outside attack. There is actually no good reason to disable the firewall, even if access to gaming or other services is a problem, because all connectivity issues can be resolved with port triggering and port forwarding settings

Specify DMZ Server IP Address

If you want to operate a computer or a server (such as a computer that is acting as a web server or a gaming server) outside the firewall, you can have the router place that computer in the DMZ. This means that the network is still protected from attack but that the DMZ computer could potentially be attacked. To place a computer on your network in the DMZ using a Netgear router, select the Default DMZ Server check box and then enter the IP address of the computer that will be placed in the DMZ. The DMZ isn't really a place; it is a virtual location configured by your WiFi router's firewall. The DMZ is a virtual place that resides between your protected internal network and the public Internet. Placing a computer in the DMZ allows it to communicate with the Internet without the router's firewall inspecting the data flowing to and from the computer. It is not uncommon for computers offering certain services to be placed in the DMZ. Even large corporations sometimes place communication servers in the DMZ so that they do not have to open ports on the firewall to allow access to the server.


Allow Pinging of Router Internet Interface


By default, most WiFi routers are configured so that the router's interface or connection to the Internet cannot be pinged. The Internet interface for you router is actually assigned its IP address by your Internet service provider. So the Internet interface on the router is really its public interface. Allowing the public interface to be pinged can open the router up to attack since it can be "pinged to death." A malicious individual on the Internet could send a barrage of ping packets or oversized ping packets that would actually bring down the router's public interface. This kind of attack is called the "Ping of Death." Enable the router's Internet interface for pinging only if your Internet service provider (or you) needs to ping that interface to determine whether there is a connectivity problem. For my Netgear router, I select the Respond to Ping on Internet Port option to turn on this feature. When you have determined that the interface can be reached by a ping (from you or the ISP technician), I suggest that you disable the feature.

Set MTU Size

The Maximum Transmit Unit (MTU) value for Ethernet networks such as your WiFi network is 1500 bytes. Leave the MTU setting at the default unless your Internet service provider requires that a different setting be used. If you're unsure about the MTU value, contact your ISP. To change the MTU on my Netgear router, I click in the MTU text box and type a different value. Each router provides a slightly different configuration screen for setting the MTU. Your Internet service provider determines the optimal MTU for the network it services by trial and error. The only way you might perceive that you don't have the correct MTU setting for your ISP connection would be a slight slowing of the connection to the Internet—and this would only be in situations where your MTU is set higher than the ISP's and your data packets have to be broken into smaller chunks for transmission. So, bottom line, call your ISP and see whether it uses a special MTU setting.