So we have this issue where in certain cases we would only like to flush a certain class of objects and discard the rest. This is sort of a common use case if you are following the one session per request paradigm wherein if a job/request fails and the job status logging is also done via the database/hibernate then you would still want to persist the job log status however the application job data changes can be discarded. Found an excellent post here:
https://forum.hibernate.org/viewtopic.php?f=1&t=983747&sid=4988e082644059b66220836ef4c53806&start=15
So as it turns out there is no way to selectively flush objects. You can use the "evict non flushable objects" methodology (basically bu evicting the objects their changes are discarded) but often times you don't know what all objects were involved in the request.
A better design is to probably open two sessions with each request/job. One for meta data and the other for application business data. That allows better handling of request failures.
Wednesday, November 04, 2009


Sunday, October 04, 2009
Enable Mysql general query log in Mac OSX
To enable this for the current user follow the below steps
-- create or edit the existing cnf file
vim ~/.my.cnf
-- add the below variable to the file
[server]
log=/tmp/mysql_query.log
-- restart mysql
sudo /Library/StartupItems/MySQLCOM/MySQLCOM stop
sudo /Library/StartupItems/MySQLCOM/MySQLCOM start
To enable the general query log for all users add the "variable" to /etc/my.cnf instead.
-- create or edit the existing cnf file
vim ~/.my.cnf
-- add the below variable to the file
[server]
log=/tmp/mysql_query.log
-- restart mysql
sudo /Library/StartupItems/MySQLCOM/MySQLCOM stop
sudo /Library/StartupItems/MySQLCOM/MySQLCOM start
To enable the general query log for all users add the "variable" to /etc/my.cnf instead.
Sunday, August 30, 2009
Adobe Flash freezes on full screen
Have been having this problem recently wherein doing a full screen on a flash video freezes the screen. My wife watches movies online occasionally on MegaVideo/Veoh and the problem persists in both as both use flash internally.
While the Flash player is in normal mode, right click on the player and choose "Settings" from the context menu. Remove the checkmark in the box next to "Enable Hardware Acceleration".

Reference links
http://support.mozilla.com/si/kb/Cannot+view+full+screen+Flash+videos
http://www.macromedia.com/support/documentation/en/flashplayer/help/help01.html
While the Flash player is in normal mode, right click on the player and choose "Settings" from the context menu. Remove the checkmark in the box next to "Enable Hardware Acceleration".

Reference links
http://support.mozilla.com/si/kb/Cannot+view+full+screen+Flash+videos
http://www.macromedia.com/support/documentation/en/flashplayer/help/help01.html
Friday, August 14, 2009
Adcenter keyword: Setting match type
Adcenter is different from other networks as it does not have a special attribute called “match type” on a keyword. Instead each keyword has three bid fields “exact bid (EB)”, “phrase bid (PB)” and “broad bid (BB)”. The keyword match types are determined on whether a bid is specified for that match type. For instance if a keyword has EB=1.5,PB=0.75,BB=0.0 then this keyword is used in exact and phrase matches. This is different in other networks where a keyword has a single “bid” attribute and an attribute to specify match type.
Friday, August 07, 2009
Monitoring Gearman over telnet port 4730
So the only way to monitor Gearman is via doing a telnet to port 4730. The current monitoring supported commands are fairly basic. I could not locate any documentation on the support commands so had to literally look at the code to figure out the supported commands (the below command documentation is copied from the comments in code). There are plans to include more set of commands in the next release.
Command: STATUS
The output format of this function is tab separated columns as follows, followed by a line consisting of a full stop and a newline (".\n") to indicate the end of output. below are the columns shown
- Function name : A string denoting the name of the function of the job
- Number in queue : A positive integer indicating the total number of jobs for this function in the queue. This includes currently running ones as well (next column)
- Number of jobs running : A positive integer showing how many jobs of this function are currently running
- Number of capable workers : A positive integer denoting the maximum possible count of workers that could be doing this job. Though they may not all be working on it due to other tasks holding them busy.
Command : Workers
This command show the details of various clients registered with the gearmand server. For each worker it shows the following info:
- Peer IP: Client remote host
- Client ID: Unique ID assigned to client
- Functions: List of functions this client has registered for.
Any other command text throws a error "ERR unknown_command Unknown+server+command"
Command: STATUS
The output format of this function is tab separated columns as follows, followed by a line consisting of a full stop and a newline (".\n") to indicate the end of output. below are the columns shown
- Function name : A string denoting the name of the function of the job
- Number in queue : A positive integer indicating the total number of jobs for this function in the queue. This includes currently running ones as well (next column)
- Number of jobs running : A positive integer showing how many jobs of this function are currently running
- Number of capable workers : A positive integer denoting the maximum possible count of workers that could be doing this job. Though they may not all be working on it due to other tasks holding them busy.
Command : Workers
This command show the details of various clients registered with the gearmand server. For each worker it shows the following info:
- Peer IP: Client remote host
- Client ID: Unique ID assigned to client
- Functions: List of functions this client has registered for.
Any other command text throws a error "ERR unknown_command Unknown+server+command"
sudhirv@sudhirv:~$ telnet localhost 4730
Trying ::1...
Trying 127.0.0.1...
Connected to localhost.
Escape character is '^]'.

STATUS
.
WORKERS
11 127.0.0.1 - :
.
status
.
workers
11 127.0.0.1 - :
.
some crap
ERR unknown_command Unknown+server+command

#### will add more samples in action when I have this thing up and running ####
Installing Gearman on Ubuntu
Gearman is a open source job forking system. We have been evaluating its use in our project to share jobs across components. More info on the Gearman project can be found here: http://gearman.org/.
Here are the instructions on installing Gearman on Ubuntu
Here are the instructions on installing Gearman on Ubuntu
wget http://launchpad.net/gearmand/trunk/0.9/+download/gearmand-0.9.tar.gz
tar -xvzf gearmand-0.9.tar.gz

# two missing libraries that found at configure time
sudo apt-get install libevent-dev
sudo apt-get install uuid-dev

cd gearmand-0.9
./configure
make
sudo make install
sudo ldconfig

# start gearman
gearmand &

# check gearmand running
ps auxw | grep [g]earmand

# check germand listening for jobs on tcp port 4730
sudo lsof -i tcp:4730


# errors when starting gearman
Error: gearman: error while loading shared libraries: libgearman.so.1

Solution: `make install` may install libraries into `/usr/local/lib`.  It's possible
 that this directory isn't on your library search path, which will result in an error
like: "gearman: error while loading shared libraries: libgearman.so.1."  To fix this,
either add `/usr/local/lib` to `LD_LIBRARY_PATH`, or modify `/etc/ld.so.conf` or
`/etc/ld.so.conf.d` to add `/usr/local/lib`, then run: sudo ldconfig
Extract process attributes
Handy one liner scripts to extract various process attributes. You can add additional attributes to the 'ps' command to get other attributes. Below are some samples
-- Process start hour
ps -eo pgid,lstart,cmd | grep "[p]name" | awk '{print $5}' | cut -d\. -f1
-- Process start minute
ps -eo pgid,lstart,cmd | grep "[p]name" | awk '{print $5}' | cut -d\. -f2
--process start day
ps -eo pgid,lstart,cmd | grep "[p]name" | awk '{print $4}'
-- Process start hour
ps -eo pgid,lstart,cmd | grep "[p]name" | awk '{print $5}' | cut -d\. -f1
-- Process start minute
ps -eo pgid,lstart,cmd | grep "[p]name" | awk '{print $5}' | cut -d\. -f2
--process start day
ps -eo pgid,lstart,cmd | grep "[p]name" | awk '{print $4}'
command to kill a process group
If pid is negative but not -1, the signal is sent to all processes whose process group ID is equal to the absolute value of pid. The negative pid is specified in this way:
kill -s KILL -- -nn
where nn is the process group ID and may have a range of 2 to 7 digits (nn to nnnnnnn).
kill -s KILL -- -9812753
The format must include the – – – before the nn in order to specify the process group ID
kill -s KILL -- -nn
where nn is the process group ID and may have a range of 2 to 7 digits (nn to nnnnnnn).
kill -s KILL -- -9812753
The format must include the – – – before the nn in order to specify the process group ID
Saturday, June 06, 2009
Ubuntu 9.04 resets resolution @ restart
Spent quite some time today trying to make this work. Installed Ubuntu 9.04 this AM and as expected it was not able to correctly detect the monitor resolution. Installed the latest NVidia drivers (180.44) from Synaptic package and was able to set the right resolution using "nvidia-settings" app. Before saving the configuration made sure that preview of "/etc/X11/xorg.conf" was showing as to what I had set. Restarted the system and the resolution was getting set back to "800x600". Applying a resolution using 'nvidia-settings" was still working in the session however @ logout/restart it would revert back to "800x600". Here's what all I tried and the final step that worked for me:
1) The first question I had was whether nvidia drivers were being loaded at restart or not. One of the Ubuntu knowledge base suggested adding "nvidia" to "/etc/modules" such that it gets loaded at boot time but that didn't work.
.... After many failed google searches I shifted my focus to looking at system logs for any clues......
2) checked this log file after system startup "/var/log/gdm/:0.log" and it was complaining about error loading "type2" and "freetype" modules. I wasn't sure if this was causing the "xorg.comf" to fail so I manually disabled the load of these modules in the "xorg.conf" file under the section module like below. Did a restart but still the same situation however the log "/var/log/gdm/:0.log" was not showing the error this time.
Section "Module"
Load "dbe"
Load "extmod"
# Load "type1"
# Load "freetype"
Load "glx"
EndSection
2) Check log file "/var/log/Xorg.0.log". This log contains details on "xorg.conf" loading. Watchout for any errors in this log. In my case this log looked fine except the last line in the log file that said "[nvidia]: setting resolution 800x600". This baffled me. While the earlier lines in the log file correctly stated loading the correct resolution from 'xorg.conf', this last log line almost seemed like some another process was invoking at startup that was turning the resolution back to '800x600'. Googled around but no clue.
... Took a walk at a park nearby as my brains was about to explode.
3) Lot of sites/forums had samples of "xorg.conf" files from users whose system was working fine. Tried various of those but still no luck.
4) One of the forums post suggested this method. "System --> Preferences --> Display". Choosing that option prompts a question "It appears that your graphics driver does not support the necessary extensions to use this tool. Do you want to use your graphics driver vendor's tool instead?". if you click "yes" it takes you to the "nvidia-settings" tool. If you choose the "No" option, it allows choosing a resolution via the "Display Preferences" window. I select "No" and choose the desired resolution of "1280x1024" from the list and hit "Apply". As usual it worked in the session and voila!!!! it also worked after a restart. The resolution stayed @ "1280x1024".
Obviously there were a lot of other steps that I tried in vain but these seemed worth a note as they provide some clue as to what the issue might be. Hope this post helps.
my google searched keywords: Xorg.log nvidia 800x600, Ubuntu 9.04 resets resolution restart, ubuntu 9.04 stuck at 800x600, ubuntu 9.04 low graphics mode, ubuntu 9.04 loose settings on restart, ubuntu 9.04 lost screen resolution after restart
1) The first question I had was whether nvidia drivers were being loaded at restart or not. One of the Ubuntu knowledge base suggested adding "nvidia" to "/etc/modules" such that it gets loaded at boot time but that didn't work.
.... After many failed google searches I shifted my focus to looking at system logs for any clues......
2) checked this log file after system startup "/var/log/gdm/:0.log" and it was complaining about error loading "type2" and "freetype" modules. I wasn't sure if this was causing the "xorg.comf" to fail so I manually disabled the load of these modules in the "xorg.conf" file under the section module like below. Did a restart but still the same situation however the log "/var/log/gdm/:0.log" was not showing the error this time.
Section "Module"
Load "dbe"
Load "extmod"
# Load "type1"
# Load "freetype"
Load "glx"
EndSection
2) Check log file "/var/log/Xorg.0.log". This log contains details on "xorg.conf" loading. Watchout for any errors in this log. In my case this log looked fine except the last line in the log file that said "[nvidia]: setting resolution 800x600". This baffled me. While the earlier lines in the log file correctly stated loading the correct resolution from 'xorg.conf', this last log line almost seemed like some another process was invoking at startup that was turning the resolution back to '800x600'. Googled around but no clue.
... Took a walk at a park nearby as my brains was about to explode.
3) Lot of sites/forums had samples of "xorg.conf" files from users whose system was working fine. Tried various of those but still no luck.
4) One of the forums post suggested this method. "System --> Preferences --> Display". Choosing that option prompts a question "It appears that your graphics driver does not support the necessary extensions to use this tool. Do you want to use your graphics driver vendor's tool instead?". if you click "yes" it takes you to the "nvidia-settings" tool. If you choose the "No" option, it allows choosing a resolution via the "Display Preferences" window. I select "No" and choose the desired resolution of "1280x1024" from the list and hit "Apply". As usual it worked in the session and voila!!!! it also worked after a restart. The resolution stayed @ "1280x1024".
Obviously there were a lot of other steps that I tried in vain but these seemed worth a note as they provide some clue as to what the issue might be. Hope this post helps.
my google searched keywords: Xorg.log nvidia 800x600, Ubuntu 9.04 resets resolution restart, ubuntu 9.04 stuck at 800x600, ubuntu 9.04 low graphics mode, ubuntu 9.04 loose settings on restart, ubuntu 9.04 lost screen resolution after restart
Mac OSX Burn ISO Image
Here are the steps.
1) Open Finder
2) Browse "Application/Utilities"
3) Open/double click Disk utility
4) Click "Burn" icon on top. This will ask you to choose a ISO image
5) Once selected it will ask to insert a CD and voila.
Off course its easy but when you've been using Linux and Windows utilities for years, these steps can be a little perplexing and hard to remember.
******************* screenshots **********************
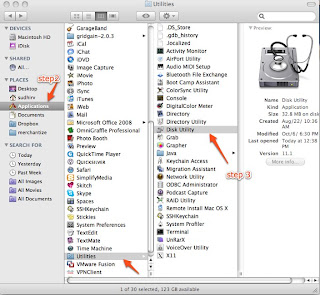
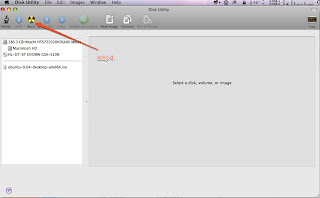
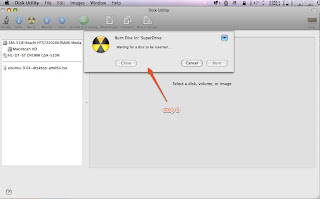
1) Open Finder
2) Browse "Application/Utilities"
3) Open/double click Disk utility
4) Click "Burn" icon on top. This will ask you to choose a ISO image
5) Once selected it will ask to insert a CD and voila.
Off course its easy but when you've been using Linux and Windows utilities for years, these steps can be a little perplexing and hard to remember.
******************* screenshots **********************


Wednesday, January 28, 2009
Perl Mysql DBI get deleted row count
Trying to capture the number of deleted rows when executing a delete statement was returning a "0E0". See below for the script details. What I found was that it was DBI's way of saying zero rows were deleted. The thing to know about DBI is that do() needs to return distinct values to distinguish the occurrence of an error from the case that no rows were affected, so it uses “undef” and “0E0”. The value “undef” indicates an error; it evaluates to false in a Boolean context. The string “0E0” indicates that no rows were affected; it evaluates to true in Boolean contexts but is treated as zero in numeric contexts. If do() returned 0 to indicate no rows were affected, that evaluates to false in a Booelan context and would be difficult from an error. You can do the following to display the row count correctly
Error:
Solution:
Error:
my $deleted = $conn->do("delete from employee where year between 1901 and 1910");
print "deleted $deleted rows.\n";

The above would print "deleted 0E0 rows"
Solution:
my $deleted = $conn->do("delete from employee where year between 1901 and 1910");
 printf "deleted %d rows.\n", $deleted;

(OR)

my $deleted += $conn->do("delete from employee where year between 1901 and 1910");
print "deleted $deleted rows.\n";
Monday, January 26, 2009
Adcenter Error Code 1514 : The Negative keywords requires partial match bid
Got this error when dealing with a keyword update through the Adcenter API. Its a shame that Microsoft has no documentation on this error and none the less anywhere on the internet, hence the drive to blog this. Here's a brief background on Adcenter Negative Keywords:
http://msdn.microsoft.com/en-us/library/bb545038.aspx
So what the error basically means is that "Negative keywords are only allowed on keywords that have a broad or phrase match bid specified". If you try to add/update a keyword with "Not Keywords" and only exact bid specified then you would get this error. In my case this was being caused by a different scenario. We use Apache Axis for our webservice calls and Axis treats a blank string as a valid content string when compared to a null string. So even if the "Not Keywords" was set to blank it was generating the "Negative Keyword" soap element. See below for SOAP source. In the soap below the broad and phrase bid is specified as 0's and the "NegativeKeywords" element is constructed making MSN think that there are negative keywords associated with this keyword and hence the error. I resolved this error by setting the string to NULL instead of a blank ("''").
http://msdn.microsoft.com/en-us/library/bb545038.aspx
So what the error basically means is that "Negative keywords are only allowed on keywords that have a broad or phrase match bid specified". If you try to add/update a keyword with "Not Keywords" and only exact bid specified then you would get this error. In my case this was being caused by a different scenario. We use Apache Axis for our webservice calls and Axis treats a blank string as a valid content string when compared to a null string. So even if the "Not Keywords" was set to blank it was generating the "Negative Keyword" soap element. See below for SOAP source. In the soap below the broad and phrase bid is specified as 0's and the "NegativeKeywords" element is constructed making MSN think that there are negative keywords associated with this keyword and hence the error. I resolved this error by setting the string to NULL instead of a blank ("''").
<?xml version="1.0" encoding="UTF-8"?>
<soapenv:Envelope xmlns:soapenv="http://schemas.xmlsoap.org/soap/envelope/" xmlns:xsd="http://www.w3.org/2001/XMLSchema" xmlns:xsi="http://www.w3.org/2001/XMLSchema-instance">
<soapenv:Header><ns1:ApplicationToken soapenv:actor="http://schemas.xmlsoap.org/soap/actor/next" soapenv:mustUnderstand="0" xmlns:ns1="https://adcenter.microsoft.com/api/advertiser/v5"/><ns2:DeveloperToken soapenv:actor="http://schemas.xmlsoap.org/soap/actor/next" soapenv:mustUnderstand="0" xmlns:ns2="https://adcenter.microsoft.com/api/advertiser/v5"><ns2:Value>xxxx</ns2:Value></ns2:DeveloperToken><ns3:UserCredentials soapenv:actor="http://schemas.xmlsoap.org/soap/actor/next" soapenv:mustUnderstand="0" xmlns:ns3="https://adcenter.microsoft.com/api/advertiser/v5"><ns3:Password>xxxxxx</ns3:Password><ns3:Username>xxxxx</ns3:Username></ns3:UserCredentials></soapenv:Header>
<soapenv:Body>
<UpdateKeywordsRequest xmlns="https://adcenter.microsoft.com/api/advertiser/v5"><AdGroupId>xxxxx</AdGroupId><Keywords>
<Keyword><BroadMatchBid>0.0</BroadMatchBid><ExactMatchBid>0.5</ExactMatchBid><Id>xxxxx</Id><NegativeKeywords><ns4:string xmlns:ns4="http://schemas.microsoft.com/2003/10/Serialization/Arrays"></ns4:string></NegativeKeywords><Param1>xxxx</Param1><Param2></Param2><Param3></Param3><PhraseMatchBid>0.0</PhraseMatchBid></Keyword>
<Keyword><BroadMatchBid>0.0</BroadMatchBid><ExactMatchBid>0.5</ExactMatchBid><Id>xxxxxx</Id><NegativeKeywords><ns5:string xmlns:ns5="http://schemas.microsoft.com/2003/10/Serialization/Arrays"></ns5:string></NegativeKeywords><Param1>xxxxxxx</Param1><Param2></Param2><Param3></Param3><PhraseMatchBid>0.0</PhraseMatchBid></Keyword>
</Keywords>
</UpdateKeywordsRequest>
</soapenv:Body>
</soapenv:Envelope>
<s:Envelope xmlns:s="http://schemas.xmlsoap.org/soap/envelope/">
<s:Body><s:Fault><faultcode>s:Client</faultcode><faultstring xml:lang="en-US">Invalid client data. Check the SOAP fault details for more information</faultstring>
<detail>
<EditorialApiFaultDetail xmlns="https://adcenter.microsoft.com/api/advertiser/v5" xmlns:i="http://www.w3.org/2001/XMLSchema-instance">
<BatchErrors>
<BatchError><Code>1514</Code><Details i:nil="true"/><Index>0</Index><Message>The Negative keywords requires partial match bid.</Message></BatchError>
<BatchError><Code>1514</Code><Details i:nil="true"/><Index>1</Index><Message>The Negative keywords requires partial match bid.</Message></BatchError>
</BatchErrors>
<OperationErrors/>
<TrackingId>xxxxxxx</TrackingId>
<EditorialErrors/></EditorialApiFaultDetail>
</detail>
</s:Fault></s:Body>
</s:Envelope>
Tuesday, January 20, 2009
Mysql (errno: 13) can't find file frm
Recently got this error when I was trying to copy a database on to another server. I basically copied the mysql data directory for the corresponding database on to the new server and logged into mysql client.
Checked the mysql log and this was being reported for the all frm files for all tables in the db. Looks like this is a permission issue on the data directory. Changed to the following permissions and it seemed to work.
mysql> select count(*) from placement;
Can't find file: './main/placement.frm (errno: 13)
Checked the mysql log and this was being reported for the all frm files for all tables in the db. Looks like this is a permission issue on the data directory. Changed to the following permissions and it seemed to work.
server> sudo chmod -R 660 main
server> sudo chmod 775 main
Thursday, January 15, 2009
DBD::mysql::db do failed: The used command is not allowed with this MySQL version
Our nightly etl process loads a whole lot of data from local files. The recent upgrade of mysql from 5.0.45 --> 5.0.67 was throwing this error
"DBD::mysql::db do failed: The used command is not allowed with this MySQL version"
when using the mysql 'LOAD LOCAL FILE' command. We are not entirely sure if this is an issue caused by the mysql upgrade or an outdated perl DBD:Mysql module. MySQL server has the local_infile set to ON via a show variables command (see below) and user has the FILE permission to the local file. A reinstall of the DBD:Mysql module also did not resolve the issue.
Looking online we came through various links that suggested we needed to specify a option "mysql_local_infile" while connecting to mysql via the DBD:Mysql module. This seemed to resolve our issue.
References:
http://dev.mysql.com/doc/refman/5.0/en/load-data-local.html
http://www.perlmonks.org/?node_id=728472
http://www.bigresource.com/MYSQL-LOAD-DATA-INFILE-command-to-import-a-text-f
ile-rODHiNex.html
"DBD::mysql::db do failed: The used command is not allowed with this MySQL version"
when using the mysql 'LOAD LOCAL FILE' command. We are not entirely sure if this is an issue caused by the mysql upgrade or an outdated perl DBD:Mysql module. MySQL server has the local_infile set to ON via a show variables command (see below) and user has the FILE permission to the local file. A reinstall of the DBD:Mysql module also did not resolve the issue.
mysql> show variables like 'local%';
+---------------+-------+
| Variable_name | Value |
+---------------+-------+
| local_infile  | ON    |
+---------------+-------+
Looking online we came through various links that suggested we needed to specify a option "mysql_local_infile" while connecting to mysql via the DBD:Mysql module. This seemed to resolve our issue.
use strict;
use DBI;
my $dsn = "DBI:mysql:mydb;mysql_local_infile=1";
my $user = "me";
my $password = "secret";
my $dbh = DBI->connect($dsn,$user,$password);
References:
http://dev.mysql.com/doc/refman/5.0/en/load-data-local.html
http://www.perlmonks.org/?node_id=728472
http://www.bigresource.com/MYSQL-LOAD-DATA-INFILE-command-to-import-a-text-f
ile-rODHiNex.html
DBD:Mysql warning statements "Use of uninitialized value in concatenation (.) or string"
We recently upgraded to the latest and greatest version of the DBD:Mysql perl module and have been seeing these warning statements in our logs a lot (believe me a whole lot to the point of annoyance for developers skimming through logs for debug help).
Use of uninitialized value in concatenation (.) or string at /usr/local/perl/lib/site_perl/5.8.8/x86_64-linux-thread-multi/DBI.pm line 929.
For now we went ahead and commented the line no. 929 in the /usr/local/perl/lib/site_perl/5.8.8/x86_64-linux-thread-multi/DBI.pm file and have seen no side effects of that. A fairly weak solution but works for now.
Use of uninitialized value in concatenation (.) or string at /usr/local/perl/lib/site_perl/5.8.8/x86_64-linux-thread-multi/DBI.pm line 929.
For now we went ahead and commented the line no. 929 in the /usr/local/perl/lib/site_perl/5.8.8/x86_64-linux-thread-multi/DBI.pm file and have seen no side effects of that. A fairly weak solution but works for now.
Wednesday, January 07, 2009
setting up a home server
I am a software guy by profession and have been lately delving into some system ops at work. Been playing around with a home server for the last month or so mostly for learning purposes. Lots of questions and searching on the internet. Came across this book that is quite useful to understand some of the basics around setting up a home network. "Home Wireless Networking in a Snap (Sams Teach Yourself) (Paperback)" (http://www.amazon.com/gp/product/0672327023). I am a linux guy and although this book is based on setting a windows server, still the router related stuff applies everywhere. Came across this book when I was trying to resolve as to why my home server won't respond to ping although ssh and ftp works. DUH!!! the router is the public interface for the home network and the settings on the router was configured to not respond to ping requests. The WAN setup page on my netgear router has a setting "Allow Pinging of Router Internet Interface" that needs to be enabled. There are some other cool stuff that can be set on the WAN setup page. See description and picture below:
Enable/Disable Firewall
Select the appropriate check box or option button to turn on your router's firewall. Some routers (such as my Netgear router) have the firewall enabled by default, and the configuration page does not provide an enable option; it only allows you to disable the firewall by selecting Disable SPI Firewall. Disabling the firewall opens up your network to the possibility of outside attack. There is actually no good reason to disable the firewall, even if access to gaming or other services is a problem, because all connectivity issues can be resolved with port triggering and port forwarding settings
Specify DMZ Server IP Address
If you want to operate a computer or a server (such as a computer that is acting as a web server or a gaming server) outside the firewall, you can have the router place that computer in the DMZ. This means that the network is still protected from attack but that the DMZ computer could potentially be attacked. To place a computer on your network in the DMZ using a Netgear router, select the Default DMZ Server check box and then enter the IP address of the computer that will be placed in the DMZ. The DMZ isn't really a place; it is a virtual location configured by your WiFi router's firewall. The DMZ is a virtual place that resides between your protected internal network and the public Internet. Placing a computer in the DMZ allows it to communicate with the Internet without the router's firewall inspecting the data flowing to and from the computer. It is not uncommon for computers offering certain services to be placed in the DMZ. Even large corporations sometimes place communication servers in the DMZ so that they do not have to open ports on the firewall to allow access to the server.
Allow Pinging of Router Internet Interface
By default, most WiFi routers are configured so that the router's interface or connection to the Internet cannot be pinged. The Internet interface for you router is actually assigned its IP address by your Internet service provider. So the Internet interface on the router is really its public interface. Allowing the public interface to be pinged can open the router up to attack since it can be "pinged to death." A malicious individual on the Internet could send a barrage of ping packets or oversized ping packets that would actually bring down the router's public interface. This kind of attack is called the "Ping of Death." Enable the router's Internet interface for pinging only if your Internet service provider (or you) needs to ping that interface to determine whether there is a connectivity problem. For my Netgear router, I select the Respond to Ping on Internet Port option to turn on this feature. When you have determined that the interface can be reached by a ping (from you or the ISP technician), I suggest that you disable the feature.
Set MTU Size
The Maximum Transmit Unit (MTU) value for Ethernet networks such as your WiFi network is 1500 bytes. Leave the MTU setting at the default unless your Internet service provider requires that a different setting be used. If you're unsure about the MTU value, contact your ISP. To change the MTU on my Netgear router, I click in the MTU text box and type a different value. Each router provides a slightly different configuration screen for setting the MTU. Your Internet service provider determines the optimal MTU for the network it services by trial and error. The only way you might perceive that you don't have the correct MTU setting for your ISP connection would be a slight slowing of the connection to the Internet—and this would only be in situations where your MTU is set higher than the ISP's and your data packets have to be broken into smaller chunks for transmission. So, bottom line, call your ISP and see whether it uses a special MTU setting.

Enable/Disable Firewall
Select the appropriate check box or option button to turn on your router's firewall. Some routers (such as my Netgear router) have the firewall enabled by default, and the configuration page does not provide an enable option; it only allows you to disable the firewall by selecting Disable SPI Firewall. Disabling the firewall opens up your network to the possibility of outside attack. There is actually no good reason to disable the firewall, even if access to gaming or other services is a problem, because all connectivity issues can be resolved with port triggering and port forwarding settings
Specify DMZ Server IP Address
If you want to operate a computer or a server (such as a computer that is acting as a web server or a gaming server) outside the firewall, you can have the router place that computer in the DMZ. This means that the network is still protected from attack but that the DMZ computer could potentially be attacked. To place a computer on your network in the DMZ using a Netgear router, select the Default DMZ Server check box and then enter the IP address of the computer that will be placed in the DMZ. The DMZ isn't really a place; it is a virtual location configured by your WiFi router's firewall. The DMZ is a virtual place that resides between your protected internal network and the public Internet. Placing a computer in the DMZ allows it to communicate with the Internet without the router's firewall inspecting the data flowing to and from the computer. It is not uncommon for computers offering certain services to be placed in the DMZ. Even large corporations sometimes place communication servers in the DMZ so that they do not have to open ports on the firewall to allow access to the server.
Allow Pinging of Router Internet Interface
By default, most WiFi routers are configured so that the router's interface or connection to the Internet cannot be pinged. The Internet interface for you router is actually assigned its IP address by your Internet service provider. So the Internet interface on the router is really its public interface. Allowing the public interface to be pinged can open the router up to attack since it can be "pinged to death." A malicious individual on the Internet could send a barrage of ping packets or oversized ping packets that would actually bring down the router's public interface. This kind of attack is called the "Ping of Death." Enable the router's Internet interface for pinging only if your Internet service provider (or you) needs to ping that interface to determine whether there is a connectivity problem. For my Netgear router, I select the Respond to Ping on Internet Port option to turn on this feature. When you have determined that the interface can be reached by a ping (from you or the ISP technician), I suggest that you disable the feature.
Set MTU Size
The Maximum Transmit Unit (MTU) value for Ethernet networks such as your WiFi network is 1500 bytes. Leave the MTU setting at the default unless your Internet service provider requires that a different setting be used. If you're unsure about the MTU value, contact your ISP. To change the MTU on my Netgear router, I click in the MTU text box and type a different value. Each router provides a slightly different configuration screen for setting the MTU. Your Internet service provider determines the optimal MTU for the network it services by trial and error. The only way you might perceive that you don't have the correct MTU setting for your ISP connection would be a slight slowing of the connection to the Internet—and this would only be in situations where your MTU is set higher than the ISP's and your data packets have to be broken into smaller chunks for transmission. So, bottom line, call your ISP and see whether it uses a special MTU setting.

Monday, December 29, 2008
Mysql increase key length
We have recently been converting most of our databases from latin to UTF-8 and have encountered issues with smaller Mysql default keylength. Mysql by default allows a max key length of 1024 size. While it was quite a bit of work to change the current data to confirm to the key length, the easier way was to recompile the Mysql source with a custom key length. Here I will detail the steps to do that:
Now you'll want to make the edits to the myisam.h file to use our longer key length instead of the default 1000 byte keylength. Below is a compare of the file before and after change:
Next you'll need to run configure / make install
wget http://www.percona.com/mysql/5.0.67-b7/source/mysql-5.0.67-percona-b7-src.tar.gz
tar zxf mysql-5.0.67-percona-b7-src.tar.gz
Now you'll want to make the edits to the myisam.h file to use our longer key length instead of the default 1000 byte keylength. Below is a compare of the file before and after change:
--- /tmp/myisam.h       2008-05-28 13:36:22.000000000 -0700
+++ include/myisam.h    2007-03-15 14:15:41.000000000 -0700
@@ -48,12 +49,12 @@
 #define MI_MAX_KEY                  MAX_INDEXES         /* Max allowed keys */
 #endif

-#define MI_MAX_POSSIBLE_KEY_BUFF    (1024+6+6)      /* For myisam_chk */
+#define MI_MAX_POSSIBLE_KEY_BUFF    (4096+6+6)      /* For myisam_chk */
 /*
   The following defines can be increased if necessary.
   But beware the dependency of MI_MAX_POSSIBLE_KEY_BUFF and MI_MAX_KEY_LENGTH.
 */
-#define MI_MAX_KEY_LENGTH           1000            /* Max length in bytes */
+#define MI_MAX_KEY_LENGTH           4000            /* Max length in bytes */
 #define MI_MAX_KEY_SEG              16              /* Max segments for key */

 #define MI_MAX_KEY_BUFF  (MI_MAX_KEY_LENGTH+MI_MAX_KEY_SEG*6+8+8)
Next you'll need to run configure / make install
./configure --prefix={choose a name here like /tmp/mysql_mod}
sudo make install
Wednesday, December 24, 2008
mysql timeout issue
The sys admins had recently changed the timeout on the firewalls to a fairly low value to deal with the excessive connections issue. This was causing an issue with the mysql servers as the nightly etl and scripts were failing with stale connection issue. Googled around to find a way to set the connection timeout in mysql settings but couldn't find any lead. One of our sys admins suggested we change the tcp timeout on the mysql boxes and that seems to have resolved the issue. here's the command:
sudo /sbin/sysctl net.ipv4.tcp_keepalive_time=90
sudo /sbin/sysctl net.ipv4.tcp_keepalive_time=90
Wednesday, November 26, 2008
Fairly Beginner Programming Excercises
I have been trying to teach programming to one of my friend and occasionally I search online for fun projects which I can give it to him as programming exercises. I will try to document the ones I gave him with notes on what I intended him to learn from the exercise:
******* Loops and Constructs ********
1) Project 1: Print a pyramid. Read (in a loop of course) a number, n, and print a pyramid that has that size. The example below shows what would be printed for n=4.
*
* *
* * *
* * * *
2) Project 2: Printing prime numbers: This is more sort of a classic programming problem and involves knowledge of basic programming constructs such as conditions, looping etc.
3) Project 3: Printing the first n fibonacci numbers. This is again a classic programming problem and involves knowledge of basic programming constructs.
******* Arrays ***********
1) Project 1: Finding missing elements in a array. So basically a array is provided that has certain missing elements like numbers between 1 - 99. The task here is to find those missing numbers from the array. This project basically requires knowledge of arrays and array traversal.
2) Project 3: Sorting a number array: This is again a classic programming problem and can be done in various ways. Knowledge gained here is again arrays.
******* Hash *********
1) Project 1: Parse a file and display words that occur more than n times. Not a requirement that you use a hash here but ideally you would.
2) Project 2:
******* Loops and Constructs ********
1) Project 1: Print a pyramid. Read (in a loop of course) a number, n, and print a pyramid that has that size. The example below shows what would be printed for n=4.
*
* *
* * *
* * * *
2) Project 2: Printing prime numbers: This is more sort of a classic programming problem and involves knowledge of basic programming constructs such as conditions, looping etc.
3) Project 3: Printing the first n fibonacci numbers. This is again a classic programming problem and involves knowledge of basic programming constructs.
******* Arrays ***********
1) Project 1: Finding missing elements in a array. So basically a array is provided that has certain missing elements like numbers between 1 - 99. The task here is to find those missing numbers from the array. This project basically requires knowledge of arrays and array traversal.
2) Project 3: Sorting a number array: This is again a classic programming problem and can be done in various ways. Knowledge gained here is again arrays.
******* Hash *********
1) Project 1: Parse a file and display words that occur more than n times. Not a requirement that you use a hash here but ideally you would.
2) Project 2:
Monday, October 06, 2008
C# Web Request Using Client Certificate
Recently worked on this project where a service was accessible over http via client certificate. This is no biggie however took me 4-5 hrs to figure it out as the issue was not with code associated with importing client certificate but with another portion of the code that I overlooked. You know how it goes, stupid mistakes here and there and boom there goes your day. Thinking that the error was with the client certificate code I searched through the anals of Google pages to figure it out and various attempts/learnings made a worth to blog out. BTW kudos to the Fiddler (http://www.fiddlertool.com/fiddler/) tool which allowed me to sniff the http outgoing traffic helping me debug the issue.
So the http service I was trying to access is a secure one and my org was issued a client certificate. There are three ways that I tried to attach a client certificate with the request.
1) Providing direct links to cert files: You can do this via this sample code. Pretty self explanatory. The additional cert you see below is the intermediate certificate agency cert that I had to additionally download.
2) Exported combined cert file (.cer.p7b format): If you have imported the client/intermediate certificate onto your computer then you can export combined certificate (with all intermediariy certificate) + private key into a .cer.p7b file format. You can use this one file instead of the two used above. Here the code to make it work:
3) Referencing a imported certificate on the workstation: You can reference a imported certificate using the below code. There a various ways to uniquely identify a certificate using 'subject name' or 'serial id' etc. I have accessed it via the subject name.
You can add the certificate to the request using the below code sample:
So the http service I was trying to access is a secure one and my org was issued a client certificate. There are three ways that I tried to attach a client certificate with the request.
1) Providing direct links to cert files: You can do this via this sample code. Pretty self explanatory. The additional cert you see below is the intermediate certificate agency cert that I had to additionally download.
X509Certificate2Collection certCollect = new X509Certificate2Collection();

X509Certificate2 cert = new X509Certificate2(@"C:\Users\...\x509_verisign-certificate.cer");

X509Certificate2 cert1 = new X509Certificate2(@"C:\Users
\..\Certificate_From_SErvice.cer.pfx", "{client certificate password}");

certCollect.Add(cert);

certCollect.Add(cert1);
2) Exported combined cert file (.cer.p7b format): If you have imported the client/intermediate certificate onto your computer then you can export combined certificate (with all intermediariy certificate) + private key into a .cer.p7b file format. You can use this one file instead of the two used above. Here the code to make it work:
X509Certificate2Collection certCollect = new X509Certificate2Collection();

FileInfo file = new FileInfo(@"C:\Users\...\exported_certificate.cer.p7b");

BinaryReader br = new BinaryReader(File.OpenRead(file.FullName));

byte[] raw = br.ReadBytes((int)file.Length);

SignedCms cms = new SignedCms();

cms.Decode(raw);

certCollect.AddRange(cms.Certificates);
3) Referencing a imported certificate on the workstation: You can reference a imported certificate using the below code. There a various ways to uniquely identify a certificate using 'subject name' or 'serial id' etc. I have accessed it via the subject name.
X509Store store = new X509Store("MY", StoreLocation.CurrentUser);

store.Open(OpenFlags.ReadOnly | OpenFlags.OpenExistingOnly);

X509Certificate2Collection collection = (X509Certificate2Collection)store.Certificates;

X509Certificate2Collection fcollection =
(X509Certificate2Collection)collection.Find(X509FindType.FindBySubjectName, "{certificate name}", false);

X509Certificate2Collection icollection =
(X509Certificate2Collection)collection.Find(X509FindType.FindBySubjectName, "VeriSign
Class 1 Individual Subscriber CA - G2", false);

X509Certificate2Enumerator certEnum = fcollection.GetEnumerator();

certEnum.MoveNext();

X509Certificate2 primCertFromStore = certEnum.Current;

certEnum = icollection.GetEnumerator();

certEnum.MoveNext();

X509Certificate2 issuerCertFromStore = certEnum.Current;

certCollect.Add(primCertFromStore);

certCollect.Add(issuerCertFromStore);

// use the below code to test if the retrieved certificate is the one you intend to.
//X509Certificate2UI.DisplayCertificate(primCertFromStore);
//X509Certificate2UI.DisplayCertificate(issuerCertFromStore);
store.Close();
You can add the certificate to the request using the below code sample:
....
.......
// Handle any certificate errors on the certificate from the server.
string uri = "request uri";

HttpWebRequest request = (HttpWebRequest)WebRequest.Create(uri);

request.ProtocolVersion = HttpVersion.Version11;

request.KeepAlive = true;

request.Method = "POST";

request.Accept = "*/*";

request.ClientCertificates.AddRange(certCollect);

string str = "POST DATA";

byte[] postBytes = Encoding.UTF8.GetBytes(str);

request.ContentType = "TEXT/XML";

request.UserAgent = "Mozilla/4.0 (compatible; MSIE 7.0; Windows NT 5.1; .NET CLR
2.0.50727; .NET CLR 1.1.4322; InfoPath.1)";

request.ContentLength = postBytes.Length;

Stream requestStream = request.GetRequestStream();

requestStream.Write(postBytes, 0, postBytes.Length);

requestStream.Close();

HttpWebResponse response = (HttpWebResponse)request.GetResponse();
Subscribe to:
Posts (Atom)